

Homemade Sherline mini lathe DRO
- Dustin Williams

- Sep 1, 2025
- 3 min read
Updated: Sep 23, 2025
So as my first proper workshop blog post, I wanted to show any readers out there my home made lathe DRO (digital read out) that I threw together for my small sherline lathe, my workhorse for making clock and watch parts.
I’ve had this (admittedly simple) idea for a few months now, but the business has been growing so quickly I’ve just recently had the time to complete it.
Sherline makes a DRO system for their mini lathes and mills, in which you put attachments onto the lead screw wheels and has wires from each that goes into a rather dinky looking DRO box, but at nearly $500 dollars, I had a really hard time justifying that purchase, particularly at a time that I’ve been looking to upgrade my mill.
I had seen similar set ups here and there on YouTube, but here is my personal twist on it..

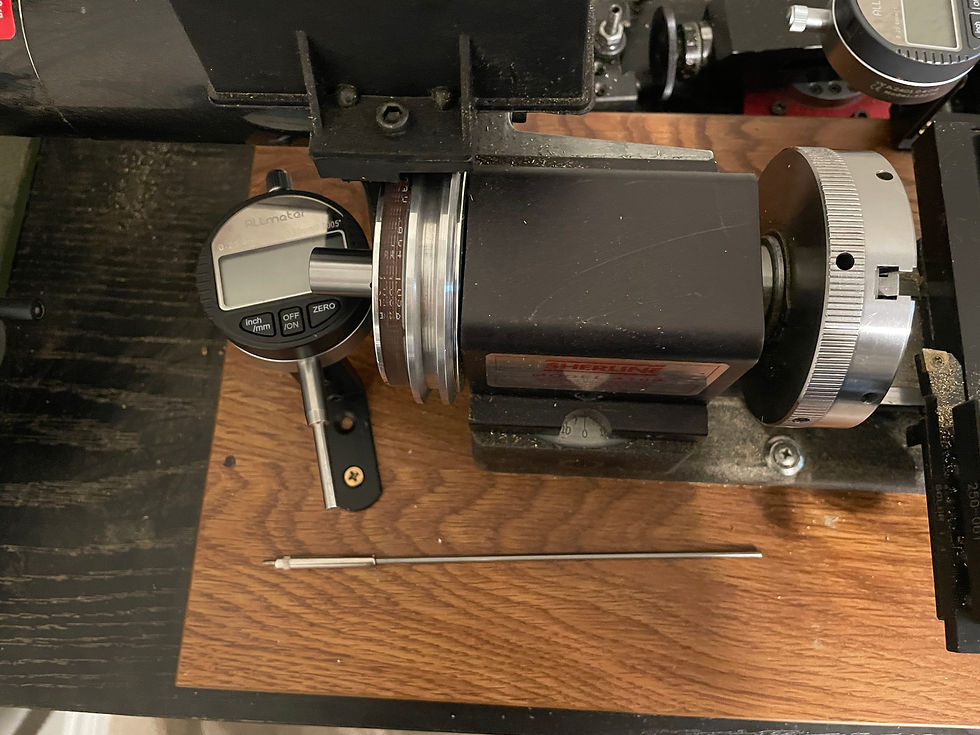
I bought a couple of inexpensive digital plunge dial indicators from Amazon at $20 apiece, a couple of small L bars, bolted them together, screwed them to the platform that the lathe is mounted to, and in the case of the X axis indicator, turned a thin bar out of silver steel, threaded the end to match the plunge indicators bar, and voila. I also had to turn and smooth the end of the long threaded bar to a half dome shape and polished it to make it slide along the Y axis smoothly and not catch when moving back and forth. Here are some closer ups of each axis indicator..


So that’s that, a pretty damn accurate system to get you close to your tolerances without having to stop the lathe and measure with your micrometer every couple of passes with the cutter.. nothing is a replacement for checking your tolerances with a micrometer obviously, but it’ll get you pretty close with less time wasted. The only disadvantage I’ve found with this inexpensive system compared to Sherline’s system is that there is not a large amount of travel in the plunge indicator for the X axis.. with the Y axis there is plenty because obviously the swing on the sherline is only about three inches, and I normally grip parts only a fraction of that size. In fact, I don’t think I’ve put anything in the chuck that has been more than an inch in diameter. With the X axis, these plunge indicators have only about 1 inch (270mm) of travel, and in most cases that is perfectly adequate for me doing horological work. I’m sure there are indicators out there with a larger amount of travel, but I have not looked for or seen any before personally. Anything bigger will need to be check with your normal micrometers or calipers. Also be aware that with the dial indicator's reading on the Y axis isn't going to be the right number at first sight. In the same way that when you're reducing the diameter of stock using the numbers on the handwheel how you have to multiply the handwheel's readings by 2 to get an accurate reading of how much diameter you've just taken off, you will have to do the same when reading the digital indicators reading. Even so, in my opinion it's still a quicker method of doing so, particularly when sneaking up on a precision dimension.
I also forgot to mention that with this system, even though there are two screw holes in the L-shaped bars, you only want to put a snug screw in one of them, because you want to be able to disengage the dial indicators when not in use by moving them away from the point of contact when not in use, so that it doesn’t wear out the springs inside the indicators over time by keeping them constantly stretched out. Here is a pic of what I mean incase I didn’t describe that in the best manner:

You can also unscrew the long thin bar on the X axis to get it out of the way when not in use.
Well that’s it for this project post, check back periodically for more horologically-related tool builds and tool build adjacent projects. My goal is to post a couple of times a month, so I guess we’ll see! Thanks for checking out my site, later bro’s!
Comments